|
Archives of CritterNews
From the 11/08 CritterNews: Getting quilts done in a hurry and Customer Appreciation Sale
Happy Thanksgiving American quilters! Those of you who live in other countries probably won’t be overeating turkey, stuffing, mashed potatoes, gravy and green bean casserole on the 4th Thursday of November, or watching the many football games shown on TV that day. The holiday is great but it is nothing short of amazing to watch the shopping season kick off on the following day: Black Friday. Crazy Americans start shopping around 5 am with sales galore.
This newsletter finds us jumping the Black Friday sales by a week. Critter Pattern Works is having a Customer Appreciation Sale starting right now. We have reduced all our patterns by $2 to $4 off our regular prices to show you how much we like and appreciate you because you allow us to do what we enjoy doing. Maybe you couldn’t get everything you wanted at a show or were thinking that it would be nice to have but you didn’t have the money when you saw the patterns on the web site.
Christmas is coming. Some of our patterns are easily do-able in less than a weekend. These would be the smaller ones, of course: the dragonflies, the frogs, the otters, the manatees, the lizards, the giraffes, and others, even the Nativity. You could use the construction idea I explained in the Nativity pattern to speed things along. I used the cotton batting as my stabilizer and sewed all the backgrounds to it. Then, I cut out and fused all the appliqués to the backgrounds and I raw edge sewed them in place. I then beaded all the parts I wanted to embellish (the camels’ bridles and the star, jewels for the wisemen…). All the messy parts of the sewing threads from the bobbin are on the wrong side of the batting. They get covered up by the backing fabric. The quilting is then done with the darning foot and straight stitching, FEED DOGS WORKING, through all three layers. The difference between raw edge stitching and quilting is where you do it. Raw edge stitching goes on the edge and inside the appliqués and quilting goes on the background fabrics. The action is the same. Keep the project parallel to you as you sew (with the darning foot working you don’t need to turn the project as you would with a regular sewing foot, because the darning foot jumps up and down as you sew). You push the project back and forth up and down and around to get the stitching done. You will get more even stitches with the feed dogs working because you can’t really push the project too far. The faster you sew, the smaller the stitches are.
I had a woman approach me at a show recently about teaching online classes on her website. I am curious if any of you have tried an online class that would sell for under $40 for a three-week class. Please share with me what you liked or didn’t like about this method of learning.
After thinking about it a while, we decided not to go with this idea. Paul (my DH) and I discussed other methods of education looking under every rock possible. We decided that FREE was a better way. Why? Because everybody can afford the tuition for a free class, right? We will be making short videos to be played on YouTube.com with a link on our web pages where the information will be appropriate. Now here is your chance to become a big part of this method of learning…I need to know what is keeping you from trying something new. Help me understand what you need to see to do for you to do what I do and give you confidence that this appliqué work is actually FUN not WORK! I was told at one of the shows by a woman speaking to me, that she simply did not do the “A word,” as she called appliqué. Email me your suggestions.
One of our fans, Judy, in California was disappointed when I wasn’t demo-ing drawing on the sewing machine to make the animals look furry. The booth was only 8 feet wide and there was not place for me to sit without blocking the traffic flow. So drawing with the sewing machine is one subject that needs to be covered. Do you realize that with the YouTube videos you can write comments on the video page with suggestions? I would respond to the question or suggestion and everyone would benefit. We are currently researching video cameras and then need some time to learn how it works. I would think this will be going up in less than three weeks. Are you excited? I am.
Over the last few months I realized that my newsletters are getting more educational. I was thinking that all the folks that are new to the newsletter, are missing out on the info I spoke about in previous months. I added the important info by subject matter in a new section of the web site called Archives of CritterNews on our home page on the left side.
Last month I told you about Pollyester’s (Paul’s cat) little present for us: a live chipmunk. Because we were busy doing shows, I didn’t have time to deal with rounding it up and out of the house. I was concerned that he would die and I didn’t want to kill him as the Game Commission spokes person suggested I do. So I left him some chunky peanut butter and water and some bird seeds. Later I found that he was flying around the house (they don’t walk you know) at a great clip. He was helping himself to the cat food. He would stuff his little mouth with it and sit on the windowsills and that evidence would drop to the floor (Polly and Alfie did not clean up the crumbs). We finally went to the hardware store and purchased a small Havatrap and baited it and waited. The first day with the trap, Paul saw him shimmying up a five-foot metal rack I have for plants by the sliding glass door. The second day Paul asked me if the doors on the trap were down, did we capture Chip? Yep, I released him outside and he shot over to the potting shed. Freedom!
Till next time, have fun with your Critter Pattern Works Customer Appreciation Sale!
From 10/08 CritterNews: All about our PDF patterns and Time Management
When we get your order for a PDF pattern, we charge your credit card, receive a Paypal payment or check and then send the PDF pattern to a service that sends you an email inviting you to come to their site to download and print the pattern. This is faster and cheaper than snail mail. If you happen to live in the Middle East, the government might open your snail mail and destroy it if they don’t approve of the subject matter. Sending a PDF Nativity pattern eliminates that problem. Another customer in Italy received her patterns only two MONTHS after I sent them by air mail. People in other countries report having to pay duties almost equal to the price of a pattern.
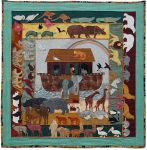
If there is a pattern that you might like to see as a PDF file, write me an email to see if it can be done. Some pattern parts are too big to be printed on 8 ½” x 11” paper and some patterns are too large (like Noah’s Ark) it would require lots and lots of pages, but there are probably lots that would be do-able I just need some feedback from you.
Someone asked me recently to talk about time management. I am assuming that she meant, finding the time to get to our passion, quilting. So I will talk about how I get things done.
Thoughts on Time Management...
I strongly believe in multi tasking. When I am a passenger in the car, I am reading if it isn't too dark. I keep a book in the car so I am never wasting time. When I find myself in a waiting situation, I take the book with me. This book is not fiction. It is a picture book with words. The current book is about quilt journaling. Tomorrow we are leaving the house at 6 AM, so I will be vegging out, since it is still dark then. When I am watching TV, I am usually surfing the net, researching the theme of the next pattern. My favorite show, I try not to miss is the Gardening by the Yard on HGTV. The host, Paul James, made the suggestion last weekend to water houseplants on demand, not every Tuesday. I clean my house the same way. There is no point in cleaning if I am going to be away. The cats don’t care. I clean when I can’t stand to look at the dust bunnies and spider webs. Keeping after the clutter is hard. Then when I need to find something, it is under junk. That wastes time. So I aim to put important things where I need to find them, when I need them, like bills and contracts for shows need to be on a clipboard that says “Do Not Loose”. Then I pay for them once a week, or every ten days.
Part of my multitasking, is thinking. I hang up the quilt top that I am working on. A lot of designing of a quilt is done in the thinking stage. Right now I am thinking that I would like to make a quilt with crows. I am researching crows, reading about them and looking at photographs, trying to get a feeling for their unique-ness. I am wondering where I am going to find black and charcoal prints to make crows. I can’t see the quilt in my head yet. Meanwhile, my sheep major opus quilt hasn’t got any fences and borders. It is hanging on my design board and I am trying to decide how I am going to photograph it when it is done. The board is 42” wide and the quilt top without the borders is going to be at least 10” wider than that. So the sheep hang wait for the borders and cornerstone sheep heads. Are the fences going to be felted? And then how is the quilt going to quilted? Usually crazy quilts aren’t quilted, so I need to address that. Once all the decisions have been thought out, the doing is a snap.
Another great time saver is having someone else do the cooking. Paul is quite talented in the regard, so I let him cook and I clean up. Paul asks me at breakfast what I want for dinner. Most of the time I don’t want to think about that.
I love gardening. I try to sneak some time in for that too. I never know what tasks I need to do until I go outside. I realize that there are a lot of dead mice lying around in the grass that need to be buried. Polly is a great mouser. Sometimes she brings little critters in the house. There is a chipmunk in my dining room. I think it is behind the china cabinet. I don’t want it to die. He is really cute and fast, but I wish it would leave. The last mouse she brought in wasn’t so fast, and I was able to catch it and release it outside.
I was describing removing water spouts (extra branches that are atypical of the plant) from my star dogwood to a friend from college. She told me how much she enjoyed trimming trees. It is like creating sculpture, she said. My plan for the yard down the road is to have much less grass, and lots of perennials. That cuts down on repetitive gardening (cutting the grass).
I would love to hear what others have discovered works for them to find time for quilting. You can use me as a sounding board and I’ll pass on the hints in a future newsletter.
From 10/08 CritterNews: Choosing COLOR
How many of you have trouble choosing colors for your quilts? Why does this seem to be such a stumbling block? We all get up in the morning and get dressed. We put on clothes that have colors and we combine them without too much thought, right? What is the difference? Look in your closet to see what colors you prefer. Look at the artwork on the walls of your house for inspiration. I designed my living room based on a request from Paul for the paint color, coral, and a not too realistic painting I bought with fall leaves and water in colors I liked. The painting then helped me choose colors for the furniture (couch: purple, loveseat: green and easy chair: red), and a rug I already had that blended in with all the colors. All of these colors were soft as opposed to bright. Then I found a hand woven tapestry with trees and a sunset and birds, made by a child in Egypt in similar colors that were in the painting. When I was in college I had always loved this style of weaving. I was thrilled to find one and have a choice! To explore these tapestries click here: http://www.marlamallett.com/tapestries.htm
How does this relate to choosing colors for quilts? Sometimes a fabulous fabric catches your eye and that is where your color choices begin. It isn’t necessary to match all the colors in that print. Choose ones that blend well with it, maybe a bit darker or lighter than the ones in the fabulous print. Choose different size prints in these colors to go with the fab print. Squint at your color choices to make sure that one color doesn’t pop out like a sore thumb.
I once had a student who was having trouble pulling things together when she was making a cat vest. What she didn’t see was that she was mixing different styles of prints that were fighting with each other. She had old-fashioned calicoes, contemporary prints and batiks. She was missing the theme or flavor, a raison d’être…and thereby missing the mark. When we took the cats off that were old-fashioned calicoes, the vest looked 100% better. This is another element of design that needs to be dealt with. If you question your own choices on this or anything else that doesn’t seem right with your quilt, ask someone (a kid or husband) who knows nothing about what you are doing, to give you his or her opinion. It is amazing how they can zero in on your problem. Sometimes turning your design upside-down and looking at it in a mirror will open your eyes.
From 09/08 CritterNews: Get over your FEAR of Applique
I have been giving lectures at the last couple of shows and I am getting a huge sense of the trepidation that many quilters have when it comes to doing appliqué. Some people are not willing to challenge themselves to making anything beyond a four patch! Somebody has instilled in them that machine appliqué is HARD. I get so frustrated with this “I can’t do this” attitude. Since you signed up for this newsletter, I am assuming that you are interested in learning all you can about the applique that I am so passionate about. Remember that applique doesn’t have to be perfect like piecing where points have to be precise.
When I explain the steps involved to make and sew an appliqué I am either seeing a light bulb going on in the audience’s heads (“This is easy, even I can do this.”) or total denial that appliqué can be done by anyone with half a brain. I have been demo-ing in the booth and showing people that raw edge appliqué can be done with a basic sewing machine with a darning foot with the feed dogs working and straight stitch. Yes, you can stitch with the darning foot and have the feed dogs up. Why would you want to do this? You get more even stitch length! Wow, what a concept, letting the machine feed the fabric instead of tensing yourself up trying to control the stitch length when you use the feed dogs disengaged. Placing a tear away stabilizer behind the background fabric is a great way to keep the stitching from bunching up the background fabric. Note: I have cut away the center of my plastic darning foot to make it easier to see where I am about to stitch.
With the darning foot, when the needle goes into the fabric the foot goes down; when the needle goes up the foot goes up, allowing you to stitch in any direction, but you can’t go too far with each stitch. The faster you step on the pedal, the smaller the stitches become. The faster you go, the smoother your stitching lines are. Stitch very close to the edge of the appliqué, and if the edge gets missed, stitching around again is something I do automatically. I think the people who have been watching me, were most impressed with the squirrel tails I stitched. This makes the line more important visually, while you correct any places you might have missed. By stitching the fluffiness of the tails in several different colors of thread at different times in the demo, people could follow the thread I was currently using to see how I got the results when I stitched in arc shapes. I discovered by using different threads that the tails were more dimensional and realistic.
For those of you that can’t see me doing this, I’ll describe it for you. I use only my left hand to move the fabric back and forth. My first two fingers are on either side of the needle keeping the background fabric flat. I am using rayon threads for my appliqués. If you haven’t experimented with different threads, you might try some. If you see the Sulky thread people at a show, they often have packs of threads they call seconds…the threads are ok, maybe the numbers are missing on the spools. They are a good deal. When I was stitching some hummingbirds, I used red metallic thread for some thread painting on the throat. That wasn’t exactly what I was looking for and I added orange rayon thread to get an iridescent effect. Thread painting is different from raw edge because you are filling in an area that you want to have color, but an appliqué in that area would be too contrast-y. Thread painting more easily blends colors together either between appliqués or by itself. Usually, the direction of the stitching mimics the way the fur or feathers grow, from the face to the tail.
From 9/17/08 CritterNews: Why Applique? and improving your overall technique
As you probably know, I am passionate about appliqué. I love the freedom from precision (there are no points that have to match up…my personal bugaboo). It took me a long time till I figured out what it was that I liked about appliqué. It has to do with curved lines as opposed to straight lines. I find curved lines more appealing. This is especially interesting when I compare my garden to my neighbor’s. He is outlining all his flower beds around the house with boards, where my flowers and veggies are loosely organized in wiggly beds. If my squashes decide to grow over the edge onto the grass, the grass doesn’t get cut there till the fall. The squashes must like this approach, since the produced enough for the neighborhood.
A lot of you get hung up on making perfect stitches, when the more important issue is the overall appearance of the design. The actual stitches become secondary to the design. When I started doing appliqué, raw edge appliqué was not an option. In fact, it took a fair amount of time for satin stitching to be accepted because it wasn’t traditional; hand appliqué was the conventional method. When I learned satin stitching, it was because I didn’t have time to spend doing handwork. I had a five-year-old kid. What I loved about machine appliqué is the detail that I could get with satin stitching.
Here are some tips that you might find useful:
v Start and stop your appliqué satin stitches at 0 width. That way you don’t have to tie off the thread ends. Just cut off the threads.
v Think in terms of 3-D when planning your stitching. Stitch the lines in the rear of a design before the lines in the foreground. Stitch the belly of an animal before the legs, which are in front of the belly. This is more effective than stitching all around the outside of a design and then coming back and stitching the interior details.
v Do you ever wonder when you fuse a second color to the main appliqué, if you got the placement right? This tip is a slap-your-forehead solution: cut the whole appliqué from a single color, then use the same paper pattern to cut out the portion that is second color. Think about a white cat (whole appliqué), and then cutting out a brown spot on his back. Where does that spot go? Hold the pattern over the white appliqué cat. There is a hole in the pattern where you cut out the brown spot. Use the hole for the placement of that brown spot.
v If your stitches are causing the background fabric to wrinkle, use a tear away stabilizer.
v Use a combination of satin stitching and raw edge appliqué to show detail. Generally things that are smooth could be stitched in satin stitching, such as beaks and birds’ legs, where the rest of the bird could be raw edge stitched. Fur really looks best in raw edge stitching. If the fabric frays, so much the better.
From 07/08 CritterNews: Threadpainting and cutting up patterns to get the pieces in the right place
We have a new pattern this month: Small Forest Critters. As you may know, I try to make each pattern that I develop a little bit different from the previous ones. In this pattern there is a lot of thread painting. I used straight stitching (thread painting) with the darning foot and feed dogs engaged and sometimes variegated threads, to blend the appliqué fabrics. The results are a softer transition from one area to another. You can see the details with the raccoons in the photo of the whole quilt, but the fox close up below shows how just a little bit of stitching adds to the charm of the block. If this looks scary to you, you can get over your fear now. The pattern includes the drawing from which you cut your appliqué pieces and a full sized scan of the complete appliqué block, so you can see how I stitched the details on each animal. Many of you may be surprised to learn that you can stitch with the darning foot without lowering the feed dogs. This trick allows me to get more even stitch length and lessens the tension in the back of my neck and shoulders.
The more patterns I design, the better they get. I try to give you all the info you need to make a similar quilt to mine without copying it exactly. One lady recently wrote a scathing email about the Horses 2 pattern because there weren’t little drawings for the hooves and manes and tails in the pattern. I don’t work with individual pattern parts like she wanted. Those pieces would be the very first things the gremlins would take and hide! Did I hear you say that that doesn’t happen at your house? Yeah, right.
I cut a whole appliqué from the main color of the appliqué, then fuse all the details on by cutting up the complete pattern. If this disturbs you, you can make a copy so you don’t cut up the original, or just tape things back together when you cut off a part. The advantage of working this way is that when you cut off a part (the mane on a horse, for instance) you have a negative space on the pattern. Place the pattern with the hole cut out on top of the whole appliqué and then place then new appliqué piece in the hole. This makes it easy to get the piece in the right spot.
From CritterNews May 2008: Do you need a chuckle?
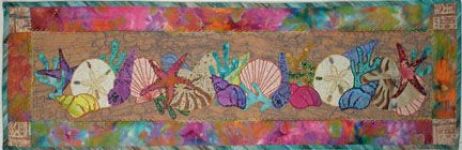
We vended at a really small quilt show outside Pittsburgh PA last weekend. The show was populated by tourist quilt show goers. One woman asked me how I had the patience to make a quilt. I was working on my sheep quilt, demo-ing raw edge appliqué, hand embroidery, and felting. She couldn’t have been a quilter. Another woman asked me why I didn’t have the exact same fabrics in my kit for the Designer Seashells pattern. The quilt on display was made in 1994. When I explained to her that I would be out of business if I still had fabrics from 1994, she said with a straight face, “Why?”
From CritterNews July 2007: Getting twice the appliques and Color
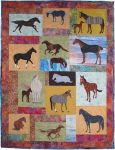
The big news this month is my new pattern Just Horses 2. I really stewed this pattern. I thought it was going to be racehorses and jockeys and such and it had a mind of its own and wanted to be a young girl’s dream quilt. That even played into the colors that I chose. The first Just Horses quilt I did back in 1990 had horses in unusual colors like green and rust. That later was remade in more horse colors. If you need a lot of horses to make a huge bed quilt Just Horses 1 and 2 could be used together. If you cut the appliqués from the wrong side of the fabric, they will be running in the opposite direction, so you could have 62 horses with both patterns!
Remember last month I was talking about the colors I wear? I mix and match from a small group of shirts, embellished sweatshirts and pants that all go together in unlimited combinations. This Just Horses quilt is an extension of that idea, going to your closet for color inspiration. All of these prints and colors make me happy, even the pinks. I am not a pink person.
|